Common Issues
iPad 3

Having trouble with your iPad 3 power button? Is turning your iPad 3 on and off not possible anymore? This issue can be irritating because it prevents you from doing certain things on your tablet such as taking screenshots, turning off your device or putting it to sleep.
While it could be a battery issue, it could just be a broken iPad 3 power button. Buttons on your tablet could experience wear and tear throughout everyday use. If accidentally dropped your iPad 3, internal components of the power button can be hit loose or broken causing connection failure.
There are a few things that you can try to fix the iPad 3 power button before taking it to CPR Cell Phone Repair shop to be fixed:
Charge your iPad 3 overnight and then try the power the power button again. If your tablet still doesn’t turn on, then the issue could be a damaged power button.
To save any data stored prior to having it fixed at CPR, you might be able to power your iPad 3 on by removing the battery and plugging it into the charger. After about five minutes, the tablet might power on by itself. Taking this action lets you get any immediate information needed.
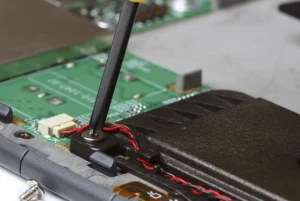
If DIY is your style, there are kits available for replacing the iPad 3 power button. However, you run the risk of causing further damage to your tablet. The other problem is that you could change the power button only to find out that the issue was actually a damaged battery. A professional diagnosis and repair by a CPR technician can minimize the risk of damaging your tablet.
If you want an expert iPad 3 power button repair, CPR specialists are here to help! We have the knowledge and experience to fix your device and bring it back to life fast.
How much does it cost, you ask? CPR will give a free, no-commitment iPad 3 repair estimate before we start any work. Find a CPR store near you today!

At CPR Cell Phone Repair, we’re able to fix a wide range of iPad 3 problems. If your iPad 3 is experiencing issues with the motherboard, we’re here to help.
The iPad 3 logic board can cause an array of problems if it isn’t functioning correctly. Are you receiving an error message? Is your iPad 3 overheating? Is it totally dead? Let the expert technicians at CPR help with a fast iPad 3 motherboard repair.
iPad 3 motherboard repairs can be complicated. A successful iPad 3 logic board repair requires years of professional experience, quality parts, and professional tools. But you can try to troubleshoot your issue before bringing it to a repair store.
Start with these simple iPad 3 troubleshooting tips:
Soft Reset
This process restarts your tablet safely, without disrupting or erasing the content. Your data is preserved. To soft reset:
Check for Low Memory
Low memory can cause slow device speed, power issues, and installation complications. To check this:
Update Software
Check that your iPad 3 is running on the most recent software. There may even be an update that improves battery life.
Bring your broken iPad 3 to CPR for fast and friendly motherboard repair. Worried about how much the repair will cost? Our certified techs can conduct a free, no-commitment estimate for all iPad 3 repairs.
Plus, with same-day service, CPR can save your iPad’s life while you wait.Visit one of our conveniently located CPR stores today!

When you’re in need of fast, professional iPad 3 home button repair, rely on CPR Cell Phone Repair. Apart from the screen, the iPad 3 home button is the most utilized element of the device, hence proper function is essential.
Is your iPad 3 home button sticking, lagging or just plain unresponsive? These are common problems that many iPad 3 users run into. If your Apple warranty has expired, it may be time to visit the professionals at CPR Cell Phone Repair.
Before you bring your iPad 3 and its broken home button to a professional technician, here are a few troubleshooting tips to try:
Clean the Home Button
Dirt or sticky substances on or around the iPad 3 home button could be the cause of your problems. Try using rubbing alcohol and a tissue or cotton swab to wipe on and around the home button.
Calibrate the Home Button
Enable On-Screen Home Button
Sometimes even the most valiant troubleshooting attempts don’t produce results. If you find yourself at a loss, bring your device to CPR. Our experienced technicians are happy to perform a fast iPad 3 home button repair!
How much does it cost, you ask? CPR will give a free, no-commitment iPad 3 repair estimate before we start any work. Find a CPR store near you today!

When you’re in need of iPad 3 water damage repair, rely on CPR Cell Phone Repair. At CPR, we specialize in repairing water damaged devices and will bring your device back to life, rescue your data, and replace any parts that may have broken.
Has your iPad 3 gone for an accidental dip in the pool, fell in the toilet or went through the wash? No worries, accidents happen and CPR is here to help.
There are a few things you can do before bringing your device to a professional repair team. Below are some Do’s and Don’ts for troubleshooting a liquid-damaged iPad 3:
If you iPad 3 has experienced water damage, do:
If you iPad 3 has experienced water damage, don’t:
Bring your water damaged iPad 3 to CPR for fast and friendly service. Our technicians will open your tablet, dry out the internal components, rinse the device of any debris, test the parts, and replace any permanently damaged parts.
Wondering how much it will cost? CPR offers a free, no-commitment estimate for all iPad 3 repairs. Visit one of our conveniently located CPR stores today!

Has the camera of your iPad 3 suddenly stopped working? For most of us, a working tablet camera is essential. To get your broken iPad 3 camera back to working optimally, bring it to the knowledgeable technicians at CPR Cell Phone Repair.
Some iPad 3 camera problems are a result of obvious damage, and other times the camera just stops working, and it is unclear what the issue is. If you are having trouble with the rear or front camera on your iPad 3, stop in to CPR.
Before you bring your iPad 3 to a repair service here are a few troubleshooting camera tips to try:
Check the Memory Card—Make sure your memory card is properly inserted. To check, pull out the memory card and re-inserting it carefully to make sure it is in the correct position. Once you are sure it is firmly in place, test the iPad 3 camera again.
Perform a Soft Reset – This process restarts your tablet safely, without disrupting or erasing the content. Your data is preserved. To soft reset:
Update Your Software – Check that your device is running on the most recent software. If you recently installed a new app before the iPad 3 camera stopped working, you might want to try uninstalling that app to eliminate it as the cause.
If you have tried the above suggestions, and your camera still does not work, the best option is to let a professional repair service, like CPR, look at your device. Bring your iPad 3 to CPR and have our expert techs complete an iPad 3 camera repair.
How much does it cost, you ask? CPR will give a free, no-commitment iPad 3 repair estimate before we start any work. Stop into any of our conveniently located CPR stores today!

iPad 3 battery replacement often stems from normal wear as your tablet ages. But what if your device is new or hasn’t been used as often? Surprisingly, lack of use can affect the battery just as much, like failing to exercise a muscle.
If you’re encountering iPad 3 battery problems, continue reading to understand more and figure out how to get the repair service that’s right for you.
Since the advent of the first iPad, Apple tablets have had a bit of a problem with battery complaints. Some of the complaints are due to users simply not realizing how much battery they utilize by streaming online television or playing high-graphic games. Other complaints are more grounded in the seemingly short battery life. Here are the top problems for the iPad 3 battery:
According to the Apple website, general care habits can greatly impact battery performance. For instance, when charging, it’s best to remove the iPad 3 case and allow to charge from empty. When storing (especially for long periods), it’s best to have the battery at a half charge state and keep the device in a temperature-controlled environment. High or low temperatures can stress the battery, causing it to weaken.
“The first iPad had a dangerous overcharging issue,” cited by Dr. Raymond Soneira of DisplayMate. He and others found that “the battery charge indicator shows 100% charged, the battery keeps on charging. The repercussions for users could be dire as a battery could explode.” As of yet, this has not been proven to be a problem for the iPad 3, but it’s definitely something to watch out for; take the precaution of unplugging your device when it becomes fully charged.
The first route of replacing the iPad 3 battery is to check if your tablet is under any warranty. If not, you’ll want to do a little research to figure out which repair service is the best option for you. We’ve outlined some of the best choices for you to consider.
Apple will only replace your battery if the problems you encounter are due to normal wear or factory defect and you are within the One Year Warranty. So if you spill liquid on your tablet or encounter deteriorated battery life outside of the first year, you’re out of luck and have to hand over around $100 plus shipping for a replacement device.
Third-party repair services such as B+B will give you a replacement battery and install it for you at a lower cost than Apple, usually around $80. It’ll also often take less time, perhaps a single day versus several when sending your device into Apple.
With more than 250 locations across the United States and Canada, CPR is a convenient option for fast and affordable iPad 3 repairs. It’s difficult to quote a cost because battery damage could be due to many things that might indicate further phone issue. However, you can walk into a store or visit online for a free estimate.
For those who prefer taking a hands-on approach to solving technological issues, replacing your iPad 3 battery on your own might be the right choice. However, it should be noted that DIY tablet repair is dangerous to both you and your device. If you end up damaging your device further, you’ll be out of warranty and have to pay even more for repair.
Still set on DIY iPad 3 battery replacement? Follow the steps below:
Once you have the battery of your iPad 3 replaced, you don’t want it to drain too fast. Here are some preventive measures that can help you extend the iPad 3 battery life:
With these tips on hand, you will be equipped to handle the job. Replacing the iPad 3 battery without any kinks requires a steady hand and experience, so if you are not familiar or don’t feel comfortable with these steps don’t attempt to do this on your own. Instead, find the nearest CPR store, and let our expert technicians fix your iPad today!

The iPad 3 debuted in mid-2012 and was discontinued after only 6 months, being replaced by the 4th generation of the same Apple tablet. And like all other tablets, one of the biggest complaints and most common user issues revolves around iPad 3 screen replacement. With a thin, light-weight device, accidents do happen, and the fragile screen takes the brunt of the damage. From shattering to scratches, the iPad 3 has seen its fair share of physical hardship.
But physical damage and deterioration is not the only reason to replace your iPad 3 broken screen. In fact, there are several problems that can crop up, each with their own unique manifestation, cause, and troubleshooting.
In the case of physical damage or part malfunction, it’s always best to repair an iPad 3 screen with an OEM (Original Equipment Manufacture) glass/digitizer and LCD. Carrying out repair of a cracked iPad 3 screen with non-Apple parts could mean more damage down the road. Other glass replacement options may “peel” up or even break more easily. You can recognize OEM glass by its quality, as well as its origin. Only Apple stores sell Apple parts. Anywhere else sells copycat parts which may or may not last. If someone has sold you a device and claimed that the screen is OEM, you can try a water test. Drip about a quarter-sized spot of water onto the screen and tilt the device, allowing the water to roll across the screen. If it stays together in one glob, then the screen is said to be an OEM part. Note: The water test is a theory, not verified by Apple.
There is a two-week return period for new devices purchased from an Apple certified dealer. Usually, Apple stores are pretty good about replacing your entire tablet for free if you are within warranty and seeing a hardware issue like the screen turning white. However, unless you have Apple Care +, physical damage is not covered by your warranty. And even with the extra coverage, only two incidents are covered, and each incident will cost you $79. Otherwise, you’ll be paying from $400 to over $700 for a replacement iPad 3.
Cell Phone Repair stores are dedicated to finding a resolution for everyone who walks through the door with an electronic repair need, including iPad 3 digitizer replacement or an iPad 3 cracked screen. Each store carries the most common parts in stock to ensure the quickest repair possible. The exact cost of iPad 3 screen repairs may vary, but you are guaranteed an estimate prior to agreeing to repair services. (You can check the cost of iPad 2 screen repairs here to have a better idea.) In addition, every service is carried out by a qualified technician and given a 6-month warranty on parts and labor.
The final option for iPad 3rd generation screen replacement is attempting to DIY, and for that you’ll need a replacement kit. Typically, a kit will include the replacement digitizer (ie the glass) and all of the tools necessary to carry out the repair, from a spudger to an adhesive. Prices will vary depending on where you purchase the kit and what else it includes, from a new home button to an LCD screen. On Amazon, the screen replacement kit for iPad 3 might cost $15-70 while on Ebay it could cost around $25 for the LCD replacement alone.
If you decide to figure out how to change glass on an iPad 3, a good place to start is with a kit like those mentioned above. The next step is finding a trusted source for step by step DIY instructions. Because this is a complex repair, we strongly advocate against replacing the iPad screen on your own, unless you have prior experience. Even simply replacing the glass can damage the more expensive LCD below. Not to mention that it negates any prior warranty.
However, if you are set on attempting DIY repair, a great source for iPad screen replacement instructions can be found on iFixit.
Cell Phone Repair is not only affordable and fast, but it’s also safer and includes a more long-term investment than DIY repair or other service options. No matter your problem – white screen, tinted display, or broken glass – CPR can give you quality iPad 3 screen replacement with peace of mind.

In addition to being able to repair nearly any small electronic gadget that comes through our doors, and being able to complete most repairs in less than two hours, we also guarantee the quality of our workmanship and the quality of our parts for a full 6 months!
What does it mean for you?If, at any time during our limited lifetime warranty period, the original repair fails because of the quality of the part we installed or the workmanship in repairing the device, we will fix it for FREE. No questions asked. Can’t beat a guarantee like that!
All CPR Stores are independently owned and operated. As such, not all stores may offer the same warranty.