iPad 2 Screen Replacement: Expert Repair or DIY?
Letting your little ones play with your iPad 2 may be all fun and games – that is until it’s grabbed by the case, which detaches, and the iPad goes spiraling toward the ground. We have all faced similar moments of horror with some device or another. And in times of crisis like this, it’s nice to have your options laid out for you so that you can get back to life with a full screen!
Determining the iPad 2 Screen Damage First
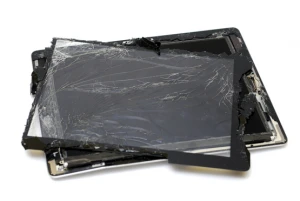
When a slip of the fingers causes your iPad to go tumbling, it gives you little relief to have a protective case. The iPad is a well-designed but rather delicate piece of equipment. Dings, dents, and scratches are all rather common – but they do not require the same iPad 2 screen replacement as a display that has spider-webbed or shattered completely.
Here are a few “home” remedies for iPad 2 screen scratch repair:
- Gently “erase” the scratch with a clean pencil eraser. Move in the direction of the flaw until it disappears, then wipe with a clean cloth.
- Fill the scratch with vaseline. Lightly wipe dry the area, without pressing too hard so as to leave some of the vaseline behind.
- Smear a dab of toothpaste over the scratch until it fades.
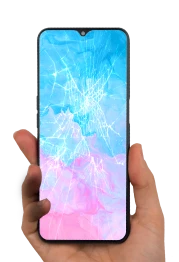
And what if you are one of the unlucky Apple users to incur a cracked iPad 2 screen? That is where the difficult decisions come into play. Chances are that you are looking for the least expensive and safest option that will put your device back in your hands as soon as possible. Take a look below at one of the biggest factors facing those who need iPad 2 display repair – cost.
iPad 2 Screen Replacement Cost
By Apple or Other Experts
You may be able to get a free iPad 2 screen replacement if you are still under the standard Apple limited warranty (and the damage is not accidental). But more often than not, an iPad 2 cracked screen is due to being dropped or crushed. In this case, you will have to pay around $400, which Apple stores use to essentially replace the entire device.
Apple remains the most costly iPad 2 screen repair service while many third-party repair service providers will have the same service for less than $200. A good place to start is by gathering up the cost and timeline quotes from different expert repair parties. Cell Phone Repair, for instance, offers a free assessment and estimate of your iPad 2 repair needs (for cracked screens, battery, charging port and more..).
iPad 2 Screen Replacement Kit
By deciding to take a DIY route, the screen repair cost will be much less. There are several iPad 2 screen replacement kits available online, from Amazon to eBay, for as low as $10 and up to as much as $50. It’ll come with a variety of tools as well as parts (an iPad 2 digitizer and LCD display, sometimes a home button, etc.).
iPad 2 Screen Replacement Service Options
With the relative costs in mind, let’s look a little more closely at the repair options:
Apple Store
You may have heard the idea of cracked iPad 2 screen warranty thrown around, but Apple has not made it simple. While every iPad comes with a complimentary one year hardware warranty and up to 90 days of complimentary support, it doesn’t cover your typical fumbles and accidents. Unless, of course, you upgraded to the Apple + support which covers two incidents of damage with a service charge of $49 per incident. Repairs take 3-5 days in store or up to two weeks through the mail.
CPR Cell Phone Repair
Instead of falling back on Apple, you might choose to rely on the excellent customer support of CPR stores across the country. Technicians are always on hand to assess your broken iPad 2 display, and each store carries the parts necessary for iPad 2 LCD repair service – usually within one business day!
How to Replace iPad 2 Screen (A DIY Guide)
The iPad 2 is structurally compact and can offer several difficulties for any DIY repair. To even open the device requires a heat gun and replacement adhesive, so do not attempt this repair with those on hand. Expert iPad 2 screen replacement may cost most, but it also gives you the peace of mind that your device will be handled with expert care. Otherwise, you are taking responsibility for potential damages in the repair process. In other words, any existing warranties will be rendered void.
If you decide to go through with DIY, here are the steps for how to replace the iPad 2 screen:
- The cracked iPad 2 screen is held on with nothing but adhesive. To remove it, you must use a heat gun (or blow dryer) to soften the adhesive around the edges. Be extremely careful and patient as you do this. Move the heat gun in circular motions approximately one inch above the device, being careful not to hover over one area too long. Simultaneously, begin prying the screen upward with a plastic prying tool by inserting it between the digitizer and the iPad frame. If the tool does not insert, the adhesive must be softened further. Work your way around the screen doing this. When using the heat gun and prying, it’s important to note a few sensitive areas to avoid:
- Cellular antenna (about one inch on either side of the camera)
- Power button cable (on the topmost part of the right side of the iPad)
- Wifi antenna (just to the right of the home button on the bottom)
- Once one section is raised, leave a plastic pry tool between the digitizer and frame and move on to the next section/side of the iPad until the screen is loose.
- Open the digitizer from the right side, as if you are opening a book cover. The left side will stay connected.
- Cut the digitizer cable (which is still connecting the digitizer and frame on the left side). This will free the screen entirely.
- Remove the four screws on the corners of the LCD display. Using a pry tool on the right, gently lift the LCD. Note: It will still be connected by the LCD cable which should be likewise gently lifted (to break the adhesive to the device).
- Locate the clasp holding the LCD cable in place. Use the pry tool to pop it out of the socket. Then place the fully detached LCD screen somewhere safe.
- Lift the two clasps of the formerly cut digitizer cable. Back the remainder out of the socket and throw it away.
- Clean out the iPad frame of leftover glass and adhesive. Use the heat gun again if necessary to soften any leftover adhesive.
- Depending on your replacement display, you may need to remove the old home button, home button bracket, and camera hold to apply to the new screen. But more likely, these will come with the replacement screen.
- Apply new adhesive strips to the edges of the new digitizer (unless it comes with adhesive strips). Be sure not to cover components around the home button, etc. And don’t pull off the adhesive strip backing just yet.
- Attach the new digitizer assembly by inserting the two ends of the digitizer cable into the appropriate socket. Part of the cable will be tucked under the metal frame so that the cable is pushed in all of the way. Then, attach the clamps holding the cable in place.
- Carefully re-attach the LCD assembly in the same way.
- Lay the LCD carefully back in place and secure with the four component screws.
- Power on your device to test the touch capability and make sure everything is working correctly. Power off again
- Remove the adhesive strip backing and carefully replace and secure the new digitizer.
iPad 2 screen replacement can be an expensive repair, but DIY repair is also complicated and requires specialized tools. Now you have all the information about all the options; the choice is yours!
MORE ON Microsoft Surface Pro 4
WHAT CUSTOMERS ARE SAYING
Lynne Lesh
I interacted with both Jake and Nicole and they both were easy to talk to and knowledgeable about ways to prolong the life of your phone's battery. The replacement was quick (an hour or so) after the battery came into the store. I would highly recommend replacing your phone's battery when it starts rapidly losing it's charges and CPR in PQ was quick and efficient.
Corday (JeT LiFe)
I've been there a few times over the past few years. They get the job done. My last visit was to get my charging port cleaned on my Galaxy S22 Ultra because it wasn't charging properly. Only took the guy about 2 minutes.
Dani Marie
Saved my very expensive tablet and they did it in less than 3days!