Common Issues

iPhone 6

Apple’s iPhone 6 was released in September of 2014 as the successor to the iPhone 5S. With a 4.7-inch display, rounded corners and an ultra thin body, the iPhone 6 design is much more modern than that of its predecessors. Additional features the iPhone 6 possesses are a Retina HD display, improved camera function, faster Wi-Fi capabilities, longer battery life, optical image stabilization and more. Don’t let a damaged iPhone 6 keep you from enjoying all that your device has to offer! Instead, use the following repair guides from CPR to resolve some of the most common iPhone 6 issues!
device image

iPhone Error 53 Explanation and Solutions

What is the iPhone Error 53?

iPhone error 53 has been making headlines over the past several weeks as it continues to stir up the Apple community. Error 53 on iPhone 6/6 Plus is caused by an interruption in the fingerprint scanner signal during the iTunes update or restore process.

iTunes will not permit a device to update or restore if the fingerprint scanner is not entirely functional. For purposes of the iPhone error 53, a device that has had its fingerprint scanner replaced does not have a functional fingerprint scanner. The reason being is that each fingerprint scanner has an IC chip that is paired with that specific motherboard.

Per media reports, Apple has released statements explaining that error 53 is an intentional security feature that is triggered in order to protect customer data that might be compromised in the event of hardware tampering. There appears to be an increase in reported errors, which may be due to the fact that Apple recently released an iOS software update and it is gradually being installed by iPhone users.

When Does Error 53 Occur?

iPhone 6 generation devices that experience error 53 are rendered useless. Error 53 is unique to iOS 9.X and can be caused by any of the following:

  1. Replacement of a damaged home button with an unoriginal part;
  2. Inadvertent tearing of a home button flex cable during a repair or other damage to the fingerprint scanner; or
  3. Debris blocking the fingerprint scanner connections.

How We Recreated the Error

We were able to cause iTunes Error 53 by doing any one of the following things to iPhone 6 generation devices by updating the software on the devices to iOS 9.X and restoring the devices in iTunes:

  1. Removing the home button;
  2. Damaging the home button flex;
  3. Damaging the home button interconnect flex;
  4. Replacing the original home button with a different home button.

After encountering the error on a device that had a replacement home button installed, we re-installed its original, undamaged home button and restored the device in iTunes for a second time. The process completed without errors and the phone’s full functionality appears to be restored.

iPhone Error 53 Solutions

If an iPhone 6 device’s fingerprint scanner is replaced and is restored after iOS 9.X is installed, it WILL experience error 53. We recommend that you do not replace any fingerprint scanners at this time. The iPhone error 53 fix is a simple solution. By updating your iPhone’s hardware to the latest version, you may resolve error 53. For those who paid out of pocket to have their iPhone repaired, contact Apple directly for reimbursement and not third-party vendors.

To rid your iPhone of the dreadful error 53, our experienced technicians at CPR Cell Phone Repair are happy to advise you on the best plan of action. Find a CPR location near you or contact us online!

articla image

iPhone 6 Home Button Replacement

The iPhone 6/6 Plus has revolutionized how daily tasks in our lives are completed with minimal stress, but there comes a time in every smart device’s life when a malfunction occurs. Apart from the iPhone screen, the home button is one of the most utilized components, so ensuring it’s functioning at all times is mandatory.

Where is the Home Button on the iPhone 6/6 Plus?

There are only four physical buttons on the iPhone, but located on the front of the iPhone you’ll find the home button, which houses a majority of the devices functionality. The home button on the iPhone 6/6 Plus has a unique component, and that’s the Touch ID. The Touch ID has a fingerprint identity sensor built into the home button so only you can unlock your iPhone. iOS 7 and 8 also house some interesting features and shortcuts such as:

  • Access Siri
  • Music App Controls
  • Multitasking
  • Accessibility Controls
  • Favorite/Recent Contacts

When your Apple iPhone 6/6 Plus home button is not working, you’ll find yourself struggling to complete the simplest tasks. If your iPhone’s home button sticks more than your gum or you’re receiving error 53 playing over and over, now is the time to fix your broken iPhone 6/6 Plus’ home button to regain your technology freedom.

Common iPhone 6 Home Button Problems

Repeatedly slamming your finger into a broken, sticky, or burning hot iPhone 6/6 Plus home button won’t magically fix your crippled device. If your one-year Apple warranty has expired, it may be time to invest in the professional services of CPR Cell Phone Repair, or fix your Apple iPhone 6/6 Plus’ broken home button yourself with a DIY kit. Before you drop a single dime, try these three simple tips to fix an unresponsive home button.

  1. Recalibrate Unresponsive Home Button
    1. Open any general app like, Weather that comes pre-installed on your iPhone 6/6 Plus.
    2. At the same time, press and hold the Power (sleep/wake) button until the “slide to power off” slider appears.
    3. Release the power button and then press and hold the home button until the, “slide to power off” slider vanishes.
    4. The application you’ve chosen closes, and you’ll now have a more responsive iPhone 6/6 Plus home button.
  2. Enable On-Screen Home Button
    1. If recalibrating your home button fails, then enabling your on-screen home button is your next priority.
    2. Simply go to Settings > General > Accessibility > Assistive Touch > Toggle On

How to Replace iPhone 6/6 Plus Home button

Error 53 After Replacing iPhone Home Button

As technology advances, there’s still room for dreadful technical malfunctions like, error 53. This common error occurs when replacing a broken home button’s Touch ID on the iPhone 6/6 Plus with an unoriginal part from another phone, or a damaged flex cable. This error will display when restoring or upgrading from iTunes after you’ve tried fixing your iPhone’s Touch ID. Every iPhone 6/6 Plus home button Touch ID sensor is encrypted with a unique serial number that’s not interchangeable with any other device. To fix this annoying error, replacing a basic accessory i-e USB cable is a quick and inexpensive fix. Apart from changing USB port or cable, your other option is to replace the cable connecting your Touch ID.

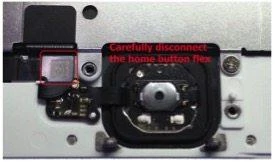
NOTE: Before you try to replace the iPhone 6/6 Plus home button yourself, keep in mind that you may get such an error after replacing the home button, but if you still want to take the risk, read the DIY guide to replacing the iPhone 6/6 Plus home button found below.

DIY Guide to iPhone 6 Home Button Replacement

If none of the recommended options worked and you’re willing to play doctor, investing in the right tools to resurrect your home button is necessary. Please note that only the iPhone 6/6 Plus’ original assembly will be able to use the Touch ID function. Installing a new home button will only restore normal home button functionality, and not the Touch ID features.

Necessary Tools:

  • Spudger
  • Tweezers
  • Small suction cup
  • Plastic opening tools
  • Phillips #00 screwdriver
  • P2 pentalobe screwdriver iPhone
  1. Power off your iPhone 6/6 Plus and remove the two 3.6 mm pentalobe screws next to the lighting connector or where you commonly plug your phone in.
  2. Take your suction cup and press it right above the home button ensuring it’s securely tight on the screen.
  3. Hold the iPhone firmly with one hand, and with the other, pull up on the suction cup to slowly separate the front panel assembly from the rear of the case.
  4. Utilizing the plastic opening tool, gently pry the rear case down and away from the display assembly. While doing so, continue to pull up with your suction cup.
    1. Note: There are several clips holding the front panel assembly and the rear case, so use a combination of the suction cup and the plastic opening tool to free the front panel assembly slowly.
  5. Gently pull the plastic nub on the suction cup to release the vacuum seal and then remove the suction from the display assembly.
  6. Using the top of the phone as a hinge, pull the home button end of the front panel away from the rear case.
  7. Remove the five Phillips screws that secure the front panel assembly cable bracket. There will be the following screws:
    1. Three 1.2 mm screws
    2. One 1.7 mm screw
    3. One 3.1 mm screw
  8. Remove the front panel assembly cable bracket from the logic board.
  9. Using the flat end of the spudger tool, disconnect the front-facing camera, sensor cable connector, and the home button cable connector.
  10. Then, disconnect the display data cable connector using the same side of the spudger tool as before.
  11. Use the flat end of the spudger tool to disconnect the digitizer cable connector.
  12. Now slowly remove the front panel assembly from the rear case.
  13. Remove the two 1.9 mm Phillips #00 screws that secure the home button bracket.
  14. Remove the home button bracket from the front panel.
  15. Using the point of the spudger tool, disconnect the home button cable connector by gently pushing it up and away from the home button.
  16. Slowly and gently push the top left corner of the home button up and away from the front panel. Do not push the home button all the way through as this membrane is very thin.
  17. Gently peel back the home button the rest of the way off of the display with the spudger tool.
  18. Using the point of the spudger tool, carefully separate the home button cable from the adhesive that’s securing it to the front panel.
  19. Once the adhesive has been stripped, remove the home button from the front panel.
  20. You may need to remove the rubber gasket around your home button depending on your replacement model.
  21. Using a set of tweezers, carefully pull the gasket up and off of the home button carefully so you don’t snag it on the home button cable.
  22. To reassemble your iPhone 6/6 Plus, simply follow these instructions in reverse order and you have officially fixed your iPhone’s broken home button.

How Much Does It Cost to Replace My iPhone 6 Home Button?

Rather than taking the risk and hassle of doing the repair yourself, you can use one of the many repair services. Here are the leading vendors and costs associated with repairing a broken iPhone 6/6 Plus home button.

Official Apple Service

If you’re within your one-year Apple Care warranty, Apple will charge you $79.00 to repair your broken home button. If your Apple Care warranty has expired, expect to pay approximately $200.00 for all iPhone 6/6 Plus home button repairs.

Other Services

If paying $200.00 is not in your budget to repair your broken home button, shopping for the best price is going to save you time, money, and headaches. Some services like iFixandRepair are charging $70.00, and Genius Phone Repair is quoted at $104.99 to fix an iPhone 6/6 Plus home button.

CPR Cell Phone Repair Service

Ensuring your iPhone 6/6 Plus home button is properly fixed the first time for the right price, iPhone 6 repair service by CPR is the most reliable solution. To replace a broken home button for the iPhone 6/6 Plus, you will be spending $75.00 to ensure your phone is functioning like new.

If none of these options worked, you probably need a professional repair for your iPhone 6/6 Plus home button. Our experienced technicians are happy to help. We keep parts for most common repairs in stock, so most of the time you can walk in a wait while we repair your phone. We also offer a mail-in repair service for customers who can’t get to a local store.

articla image

iPhone 6 Battery Replacement

The iPhone 6 is an elite smartphone that has revolutionized how we simplify our lives. From plugging in daily reminders to our own personal jukebox, the iPhone 6 is constantly working hard. Over time, all that hard work begins to take a toll on your iPhone 6’s battery capacity that can potentially lead to long-term battery life issues.

Is Your iPhone Battery Draining Too Fast?

There’re plenty of battery cases out there that will help boost the life of your iPhone, but those too will lose their battery capacity over time and require charging. You may be thinking to yourself, “how do I remove the battery from my iPhone 6?”. To avoid frantically looking for outlets to plug your phone into or running around with 5% battery, try these three simple tips to extend the battery life of your iPhone 6.

  1. Turn on Low Power Mode
    1. When only 20% of your battery remains, this new feature will enable you to gain three additional hours of battery life from your iPhone 6. Your iPhone will display a warning and provide the option to turn on Low Power Mode when it reaches 20% to save power consumption.
    2. Simply go to Settings > Battery > turn on Low Power Mode
    3. Utilizing Low Power Mode will: reduce power consumption, Hey Siri, automatic downloads, stopping Mail fetch, background app refresh, and some visual effects.
  2. Airplane Mode
    1. If you don’t require access to data, receiving or making calls, you can turn off the iPhone’s antenna. The iPhone antenna is one of the largest drains of battery life because it’s constantly checking for Wi-Fi and cellular networks.
    2. Simply swipe up on Control Center and tap the airplane logo, or tap Settings and set Airplane mode to On.
    3. If you still require data, you can use Wi-Fi when Airplane mode is enabled. With Airplane mode still on, simply swipe up on Control Center and tap the Wi-Fi icon next to it. When you’re in areas that have low coverage, enabling Airplane mode is suggested because your iPhone will search and cling onto a signal while quickly draining your battery.
  3. Screen Brightness
    1. Powering the pixels on your iPhone’s Retina display requires more energy than most of the apps combined. So it shouldn’t come as a surprise to hear that your screen is one of the iPhone’s largest power drains alongside the antenna.
    2. Simply swipe up in the Control Center, then use the slider to drag far left to turn the brightness down.

iPhone 6 Battery Replacement Cost

So you’ve tried all the tips above, and even a number of others to try and salvage your iPhone 6 battery life. Now you’re faced with comparing battery costs and where to purchase a new battery from, so consider the following:

Official Apple Store

Going to the Apple store may be your first call to action, but consider the out-of-warranty costs associated. If your AppleCare+ warranty has expired, expect to pay $79.00 for your iPhone 6 battery replacement.

Best Buy

Getting more than one quote is going to be your best bet, so what about Best Buy? According to Best Buy, if you have a plan that’s tied to Geek Squad, the price to replace your iPhone 6 battery will cost $150.00.

CPR Cell Phone Repair

By partnering with Cell Phone Repair, you’ll pay $65.00 for an iPhone 6 battery replacement, saving you time and money.

Using an iPhone 6 Battery Kit

If you’re looking to replace and remove the battery from iPhone 6 yourself, here are a number of industry leading iPhone 6 battery kits and what experts are recommending, and remember batteries are sold separately.

  1. iFixit: iPhone 6 Replacement Battery – Fix KitiPhone 6 Price: $39.95
    1. Expert Review: “The part about iFixit is their illustrated repair guides that rake you step by step through the process.” – The Dallas Morning News
  2. iCracked: Repair Tool Kit for iPhones
    1. Price: $8.95
    2. Expert Review: “The Gadgets, Life Hacks and Apps Tech Entrepreneurs Actually Use.” August 27, 2014 – Forbes.

How to Replace iPhone 6 Battery – DIY Guide

Consulting with your local Cell Phone Repair is highly recommended before performing any repairs yourself. If you already have your DIY kit in hand – here’s how to replace iPhone 6 battery instructions.

  1. Acquire the necessary DIY kit and parts to disassemble iPhone 6 battery.
  2. Completely power down your iPhone.
  3. Using a 3.6 mm Pentalobe screwdriver, remove the two screws located next to the Lightning connector, or where you commonly plug your phone into charge.
  4. Take your suction cup and place it directly above the Home button ensuring it’s tightly sealed.
  5. Slowly and gently pull up on the suction cup to separate the front panel assembly from the rear case.
  6. Next, use the plastic opening tool to slowly pry the rear case down and away from the display assembly, while slowly pulling up on the display. Since there are several clips holding the front panel assembly to the rear case, you’ll need to use the suction cup and plastic opening tool to free the front panel assembly.
  7. Remove the suction cup by squeezing the plastic nub that the metal ring goes through.
  8. Using the top of the phone as a hinge, gently pull the home button end from the front panel assembly away from the rear of the case. While doing so, make sure to keep the front panel supported at a 90˚ angle.
  9. There will be several clips located along the top edge of the front panel that forms a partial hinge. With ease, you should be able to swing open the front panel assembly.
  10. Inside you’ll see 5 Phillips screws that secure the front panel assembly cable brackets, but remove all five and keep them in the order in which they’ll be reassembled.
    1. One 3.1 mm screw
    2. One 1.7 mm screw
    3. Three 1.2 mm screws
  11. Remove the front panel assembly cable from the logic board slowly.
  12. For the following four steps, pry up only on the cable connectors and avoid doing so on their sockets located on the logic board.
  13. Disconnect the front-facing camera and sensor cable connector by using the flat end of a spudger tool.
  14. Next, disconnect the home button cable connector using the flat end of the spudger tool.
  15. Using the spudger, disconnect the display data cable connector.
  16. Disconnect the digitizer cable connector using the flat end of the spudger.
  17. Carefully remove the front panel assembly from the rear case.
  18. Battery Connector – remove the Phillips #00 screws from the battery connector bracket.
    1. One 3.2 mm screw
    2. One 2.2 mm screw
  19. Gently remove the metal battery connector bracket from the iPhone.
  20. Slowly pry the battery connector up from the socket on the logic board using the plastic opening tool.
  21. Battery – Carefully peel back the first battery adhesive tab from the bottom right edge of the battery.
  22. Pull the battery adhesive tab away from the battery and towards the bottom of the iPhone.
  23. As you continue to pull slowly, the strip will begin to slip out from between the battery and the rear case. If you feel resistance from the strip, stop pulling and continue with the following step.
  24. If you happen to feel resistance from the adhesive strip, gently pull it around towards the lower right corner of the battery.
  25. As you continue to pull the adhesive tab upward and away from the right edge of the battery, the tab will slowly slide out from between the battery and the rear case until it’s free from the iPhone.
  26. Next, peel back the second battery adhesive tab located at the bottom left edge of the battery.
  27. Again, slowly pull the battery adhesive tab upward and away from the battery, allowing the strip to slide out until you feel resistance.
  28. Once you feel increased resistance from the strip, gently pull it towards the lower left corner of the battery. If any of the strips broke off and the battery is stuck, prepare to use an iOpener to remove the battery.
  29. Flipping the phone back over and insert a plastic card between the side of the case and the battery. Do not pry against the logic board because that can result in further damages. Gently press the card in further to break up the adhesive lodged behind the battery.
  30. Remove the iPhone 6 battery.
  31. In order to reassemble your iPhone 6, follow these easy instructions in reverse order.
Sources:

Apple: iPhone Repair – Battery & Power

Forbes: How To Replace The iPhone 6’s Battery

iFixit: iPhone 6 Battery Replacement

Macworld: 34 tips to help boost iPhone battery life

articla image

The Ultimate iPhone 6 Glass Replacement Guide

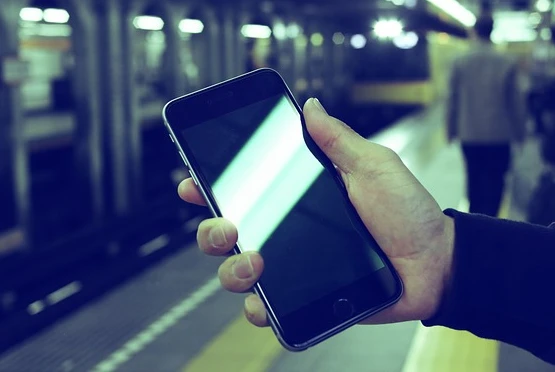
It’s only a matter of time until your beloved iPhone hopelessly slips from your grip and smashes against the pavement, while leaving you with an ugly shattered screen. Your extended warranty has most likely expired, so now you’re faced with exploring the most effective options for replacing your cracked iPhone 6 or iPhone 6 Plus glass.

iPhone 6 & iPhone 6 Plus Glass Replacement Options:

Time is money, so stop paying for overpriced repairs and wasting valuable time on replacing your iPhone 6 or iPhone 6 Plus screen. By teaming up with CPR Cell Phone Repair to replace your shattered iPhone 6/6 Plus glass, you’ll regain your piece of mind knowing your “life” is being handled by experts in the electronic repair industry.

Why Not AppleCare+?

Taking a trip to the Apple Store may be your first call to action when faced with replacing your cracked iPhone screen. If speed and price are major driving factors, Apple “Care” may not be your best available option.

After owning your iPhone for over one year, your limited warranty that covers hardware repairs has officially expired. Even after your limited warranty expires, Apple’s 90 days of complimentary support does not include glass replacement costs, nor service fees and applicable tax. AppleCare+ does extend your coverage to two years from the original purchase date of your phone, and they’ll also add up to two incidents of accidental damage coverage.

[table id=1 /]

Cell Phone Repair Vs Apple Store

At CPR Cell Phone Repair, the estimated repair price we provide you includes the parts and labor. That way you aren’t startled by hidden warranties, fees, and taxes like you’ll experience at the Apple Store. With Apple, you do have the ability to bring in your phone for an onsite repair or send it in, but regardless you’re looking at a turnaround time of 3-5 business days. Keep in mind, if your iPhone 6 (or 6 Plus) fails Apple’s calibration process, they’ll also charge you the full replacement price, which is currently $299 plus tax.

If Not CPR, Then Who?

Once your Apple warranty expires, there’s plenty of third-party repair “experts” that are dying to get their hands on your wounded devices. Before shipping your phone off to the island of misfit toys, there are several objectives that must be covered.

When deciding on a suitable repair company, research the following before committing:

  • What’s the cost? Remember, cheaper isn’t always better.
  • How long will repairs take?
  • Any type of warranties offered?
  • How qualified does the repair company appear to be?
  • Part quality?

CPR Is On Your Team

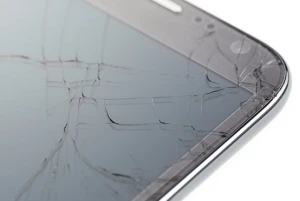
From hairline cracks to downright shattering your iPhone 6 glass, Cell Phone Repair makes it easy to get your life back on track by providing you quick and cost effective repairs all wrapped with a shiny new warranty. Neglecting screen cracks may be your first response, but over time they can lead to further damages resulting in dead spots, backlight malfunction, dark spots, and even discoloration.

The beauty of CPR Cell Phone Repair is we offer same day repairs, the ability to drop it off or mail it in, and free estimates by our specially trained staff with over 16 years of experience. So remember, if your device gets sick – CPR has a cure.

From Amazon to eBay you’ll easily resellers who claim to be experts at everything iPhone, but selecting a supplier that solely specializes in iPhone parts, while offering a spiffy new warranty is crucial. We’ve compiled the industries best DIY iPhone 6 glass replacement kits and what experts are recommending.

Best DIY Glass Replacement Kits for iPhone 6 and 6 Plus

From Amazon to eBay, you’ll easily find resellers who claim to be experts at everything iPhone, but selecting a supplier that solely specializes in iPhone parts while offering a spiffy new warranty is crucial. We’ve compiled the industries best DIY iPhone 6 & 6 Plus screen replacement kits and what experts are recommending.

  1. iPhone 6 Glass Replacement DIY Repair Kit
    1. 6 – $109.99
    2. 6 Plus – $129.99
    3. Color: Black/Space Grey or White/Silver/Gold
    4. iCracked Is Building A Global Empire One Cracked Smartphone Screen At A Time.” – December 9, 2014 – Forbes
  2. iFixit – iPhone 6 Plus Display Assembly
    1. Price: $134.95
    2. “What iFixit doesn’t tell you is how fascinating it is to crack open this remarkable and densely packed little gadget, or the satisfaction of repairing your own stuff.” – Cnet
  3. If you prefer to buy individual parts over an entire DIY kit, we highly recommend Wholesale Gadget Parts. WGP carries over 27 different manufacturers along with accessories and closeout deals ensuring you receive the best parts, for the right price.

How to Replace Cracked iPhone 6 and iPhone 6 Plus Glass – A DIY Guide.

So you’ve decided to play doctor and replace your screen on your own. If you’re not a professional technician you can potentially risk further damage to your phone, therefore making your wallet shrink even more. If you already have your DIY kit in hand, proceed with caution and here are the guidelines on replacing iPhone 6 and 6 Plus screen.

  1. Power Off Your iPhone 6/6 Plus
    1. Before operating on your phone, ensure it is completely powered down by pressing and holding the power button until you see the Slide to Power Off indicator. If it appears to be frozen – press and hold both the home and power button at the same time until it shuts down completely.
  2. Locate & Remove Dock Screws:
    1. On both sides of your Lightning Dock – or where you commonly plug in your phone to charge, you’ll notice two screws. Remove both screws using a TS1 (0.8mm) 5-point (pentalobe) screwdriver.
  3. Remove The Cracked Glass (7 Steps):
    1. Place your suction cup directly above the Home button – then gently pull up on the bottom of the display. Go slowly because there are cables at the top attaching the display to the logic board.
      1. Remember: if your iPhone 6/6 Plus’ screen is shattered to pieces; you will need to use a razor blade instead of the suction cup. Using the razor blade, precisely pry the bottom of the glass up just enough to get the flat end of your spudger tool underneath.
    2. Next we need to remove the cables, so open the screen to about 90 degrees and hold it steadily so the top right corner of the inside is accessible.
    3. Remove the five screws located in the right hand corner and use a #000 Phillips screwdriver to do so. Do not mix these screws up because they’re different sizes and have specific destinations. Placing them in a similar pattern will help when you screw them back in.
    4. Using your fingers or small tweezers – remove the display shield. Be mindful of the cables underneath.
    5. Four cables hold the display to the logic board – so remove the first two cables using the flat end of the spudger tool. Avoid prying at the board and only at the cables.
    6. Once the first two cables are removed, you’ll now see a third cable. Remove this cable the same way you did previously.
    7. Underneath the third cable, you’ll see one cable remaining. Once you remove it the same way as previously, the display will be free.
  4. Transfer Touch ID (7 Steps)
    1. 1. Located on the back of your broken screen, you’ll need to remove the two screws on the Touch ID Shield. Do not mix these screws up.
    2. Remove the silver shied that holds the Touch ID in place.
    3. Remove the single cable connecting the Touch ID and Home button assembly using the pointed end of your spudger tool.
    4. Slowly push the Home button from the front of the glass.
    5. Ensuring you place the entire Touch ID and Home Button assembly in the replacement display, and ensuring it’s lined up correctly is crucial.
    6. Attach the single cable holding Touch ID to the front assembly.
    7. Using the two screws to hold it in place, replace the silver shield.
  5. Installing The New Display (4 Steps):
    1. Attach the four cables on your new display assembly to the logic board of the iPhone, basically in reverse on how you removed them.
    2. Using your #000 Phillips screwdriver, replace the display shield and the five screws that secure it in place.
    3. Carefully align the top of the display to the indents in the frame and the grooves at the top of the screen.
    4. Starting at the top, slowly push down on the glass without using any force. If it doesn’t line up naturally, try again.
  6. Replacing Dock Screws:
    1. Replace the two screws on both sides of the Lightning Dock. They’re easily stripped, so do not screw them too tight.
  7. Testing Your New Glass:
    1. Power on your iPhone and if it went correctly, the Apple Logo should appear before your eyes.
    2. Once you’re booted back up, it’s time to test everything to ensure the operation was a success.
      1. By typing on the keyboard you’ll test for dead spots and see if there are any faults in the touch screen.
      2. When you make a call, the screen normally goes black once it’s pressed against your face. So make a test call to ensure this feature is functioning properly. While on that call, ensure you can hear out of the earpiece and that the speakerphone is working too.
      3. Add a new fingerprint to the Touch ID to verify that the Home button and the Test Touch ID are working.

If you’d like to avoid any more stress through disassembling or trying to figure out which DIY kit is reputable enough to get the job done, have no fear because CPR is here. Simply visit one of our many CPR stores for a free repair estimate from one of our certified technicians. To sweeten the deal, CPR ensures all work and new display parts are guaranteed under a limited lifetime warranty – bringing you and your devices back to life.

How To Protect Your iPhone

Running head first into a brick wall is never recommended, so why treat your iPhone any different? Start living stress-free by eliminating overpriced warranties and repairs by protecting your iPhone 6 and 6 Plus. By investing in screen protectors, cases, and more you’ll extend the life of your devices and the amount of money that remains in your wallet.

articla image

Which iPhone 6 Screen Replacement is Right for You?

The newest Apple smartphone, the iPhone 6 (and iPhone 6 Plus) debuted on September 19th of this year and one issue, in particular, has prompted iPhone 6 screen replacement. Within the first weeks, users who had previously been on the edge of their seats with anticipation were suddenly on the edge of confusion and frustration. Both iPhone 6 models could bend with amazing flexibility. Shortly after, this phenomenon became known as “Bendgate,” users would pocket their brand new iPhone 6 or iPhone 6 Plus and later find an indented or broken smartphone.

Were you one of the unlucky users who bent or broke your new Apple device out of the gate (the Bendgate, that is)? If so, you probably found yourself in need of iPhone 6 screen repair. Because the screen was not quite as willing to bend as the case, and that led to shattering or spiderweb cracks. Or maybe you simply dropped your iPhone 6 in a freak basket weaving accident.

You’re in luck! We have isolated the service options for iPhone 6 screen repair based on cost and other crucial factors. Check out the options below.

iPhone 6 Screen Replacement Cost Based on Service Option:

By Apple Store

With a bigger screen than ever before, the iPhone 6 screen replacement cost is also bigger than ever. The out of warranty expense is $299 for an iPhone 6 replacement, as most Apple stores do not replace just the screen but rather the whole smartphone. For the screen replacement service alone it’s $109, or $79 service charge under the Apple Care + warranty.

By CPR Cell Phone Repair

Any of the CPR locations across the country and Canada are equipped with the most common parts in stock so that iPhone 6 repairs are quick and painless (usually less than 24 hours). The cost of replacing your iPhone 6 screen by CPR is affordable and ensured with a limited lifetime warranty on parts and service.

Using an iPhone 6 Screen Replacement Kit

Because the iPhone 6 model is so new, it’s very difficult to find an iPhone 6 screen repair kit. Like its predecessors, it will eventually have a standard kit on the market (probably around $60-70) with all of the tools and parts needed to complete your cracked iPhone 6 screen repair. As for now, if you decided on DIY glass replacement, you will have to find the correctly sized display replacement and utilize tools from other DIY smartphone repair kits.

How to Replace iPhone 6 Screen (A DIY Guide)

It is recommended to leave the iPhone 6 glass replacement to professional technicians. While many steps are similar to the glass replacement of the iPhone 5s, much is still not known about this generation of device. It risks further damage to your phone as well as puts yourself in danger to attempt a DIY repair if you do not know what you are doing. If you want to proceed at your own risk, here are the steps to follow:

  1. Power off your device. If the screen is frozen, power off with a hard reset – pressing both the home and power buttons.
  2. Locate the dock port and the twin screws on either side. Remove the screws with a 5 point (pentalobe) screwdriver.
  3. Press a suction cup onto the screen just over the home button. If your screen is cracked or shattered, you may want to tape over the screen prior to suctioning.
  4. Pull up on the suction cup to displace the screen. There will still be cables running between the front display and back panel at the top.
  5. Swing the display up to a 90-degree angle with the back panel and notice where the two are still connected.
  6. Locate the metal shield covering the display cables. Remove the five screws holding it in place. (Note: The iPhone 5 series only had four screws. Apple has added a screw in the middle of the metal shield.) Then set aside the shield and screws.
  7. Two flex cables are revealed beneath the metal shield. Dislodge each of these gently, revealing a third. Dislodge the third one, revealing a fourth. And finally, dislodge the fourth cable.
  8. The front display should now be completely free. You may need to disconnect a few components to install in the new front display, such as: the touch ID sensor, the home button assembly, the earpiece, the front-facing camera, and the heat shield. The easier way is to purchase a front display with new versions of these components already attached.
  9. Reassemble the iPhone 6 in reverse order of disassembly.

If you are not confident in your technological abilities, it’s best to avoid a DIY iPhone 6 glass replacement. Instead, rely on experts like those at Cell Phone Repair. Simply visit any one of the many CPR locations and talk to a certified technician. An estimate of the repair is free and could save you the hassle of disassembly or trying to figure out if you are covered under your Apple warranty. In addition, the work done by CPR and the new display parts will be covered under a limited lifetime warranty – giving you unbeatable peace of mind.

articla image

The Limited Lifetime Warranty

Issues Warranty

In addition to being able to repair nearly any small electronic gadget that comes through our doors, and being able to complete most repairs in less than two hours, we also guarantee the quality of our workmanship and the quality of our parts for a full 6 months!

What does it mean for you?

If, at any time during our limited lifetime warranty period, the original repair fails because of the quality of the part we installed or the workmanship in repairing the device, we will fix it for FREE. No questions asked. Can’t beat a guarantee like that!

All CPR Stores are independently owned and operated. As such, not all stores may offer the same warranty.